Friday 29 June 2012

West Dean College Hand Finishing Course


My next course at West Dean College has now gone up on their website www.westdean.org.uk
The full title is 'Hand Finishing for Woodworkers Made Easy' and is being held over the weekend from 9th - 11th November 2012. The first evening involves an hours tutorial as well as dinner and is a good chance for everyone to get to know each other. The next two days are fairly intensive and I usually make an early start. There is also the opportunity to work on late although this is optional. The cost of the course is a very reasonable £196 (if booked on line) which includes lunch on both days as well as coffee breaks and dinner on the first night. The cost for materials will not exceed £20 per person.
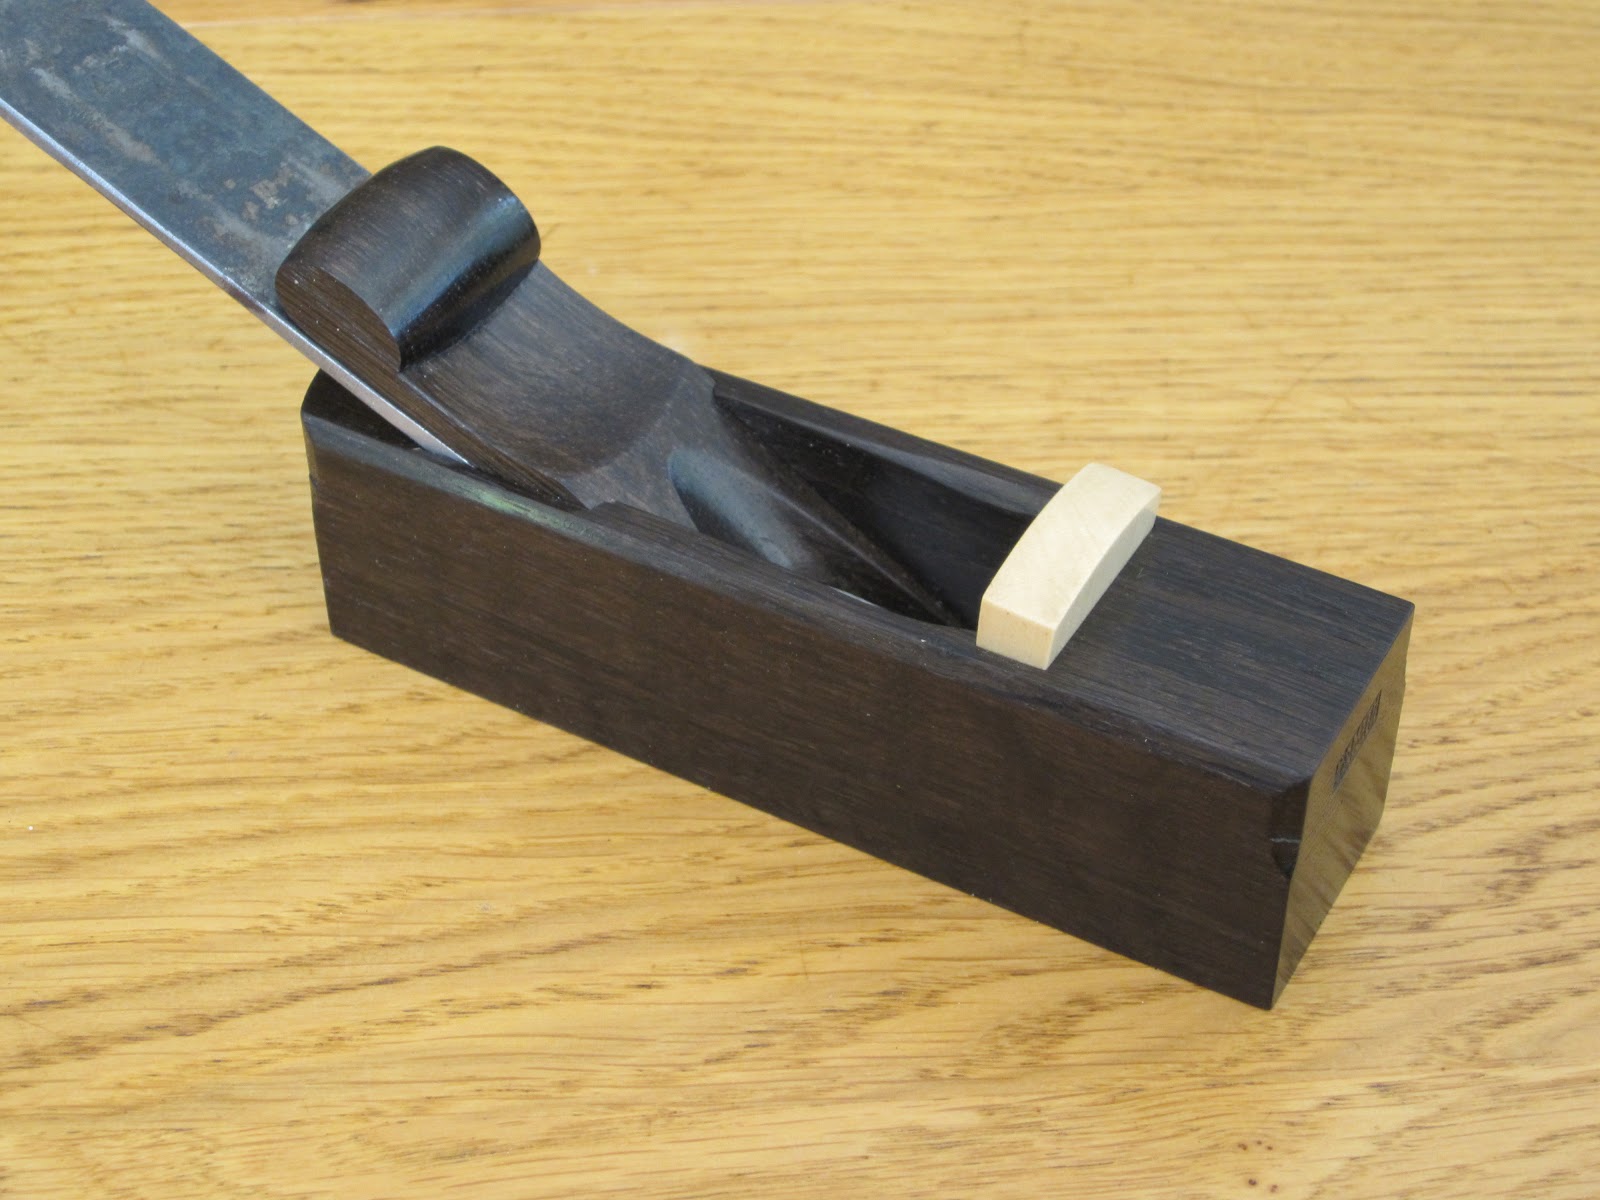
The picture above shows one of my previous courses on making a wooden hand plane, it was good fun and hard work but everyone finished!

The college itself is very picturesque and used to be a stately home, it is set in 1,000 acres of wonderful grounds and farm land. It makes me feel good every time I visit. For those not close enough to commute you can stay at the college which is well appointed with good food and a large bar. There are also plenty of B&B's not too far away.
The course is limited to eight people so best not leave it to the last minute if you want to attend.

Tuesday 26 June 2012

Walnut wall cabinet


I don't take on too many commissions but this was a piece that really appealed. The client had seen a Nakashima wall cabinet and wanted something similar in English Walnut with sliding doors. This shows a board of my finest stock opened up on the band saw.


The piece was to be through dovetailed on all four corners so I was very glad to have the assistance of my magnetic dovetail guide, especially as the wood was 7/8" thick. There were a total of 96 saw cuts on the four corners and every joint fitted straight from the saw without any paring.


Here are all the pieces ready for assembly, all the inside surfaces have been brought to a finish beforehand. The finish I used was six coats of home-made shellac cut back with 600 grit Abranet to a matt finish and then  brought to a nice sheen with a high carnauba paste wax. The shellac will give a sweet small to the inside of the cabinet and the wax will make any glue squeeze out easy to pop off.

Sunday 24 June 2012

Deep in Wood visit


 I paid a visit to the wood yard called 'Deep in Wood' near Abingdon. I went there four years ago when they were setting up and it has certainly come on. They have good wood stock and an impressive mill.
This 2" board of burr brown oak immediately caught my eye and I had to have it.


The board was quite flat which meant it can be used pretty much whole after planing.
I knocked the bark off in the shop and there were plenty of creatures living in there despite the board being dry. I treated it with woodworm solution and put it to one side to let it dry properly in my shop.


The burr is really nice and this should make a cracking little side table.

Friday 22 June 2012

Walnut bookcase

 As this bookcase is for a specific purpose, cookery books, I decided against an adjustable shelf and positioned it with a gap on the bottom of 310mm and the top 255mm. Experience has taught me that adjustable shelves very rarely if ever get adjusted.
This picture shows my set up for supporting the shelf. The centre support was attached to the shelf with dominoes and the two scrap pieces (cut at the same time as the centre support) are used to position the shelf for the thin side supports. This is easier and more accurate than balancing a spirit level.


Positioning the side supports for drilling is made much easier and again more accurate by using double sided tape prior to drilling the screw holes. It's great stuff and when you are tuned in to using it there are loads of uses around the shop. I finished the case before assembly with two coats of shellac to stop the walnut from going too dark and then two coats of Osmo Hardwax oil applied thinly with a rag.


Here is the bookcase completed and in position in the kitchen, sorry about the picture quality, it was very sunny outside, I shouldn't complain.
It fitted in very nicely and passed the wife test with flying colours!


It took all our cookery books with room to spare. That's Millie one of our terrier crosses, I think that look means it's time for a walk!

Tuesday 19 June 2012

Tim Smith mitre plane.


On my recent visit to David Stanley auctions I met Tim Smith a fine cabinet maker and budding plane maker. I ordered one of his fine little mitre planes which arrived yesterday, the packaging reflects his attention to detail.


Although styled on a traditional mitre he has added some little touches of his own.


An 18th century style makers mark.


The holly mouth closer has been set extremely fine .


The plane is 5 1/2" long with a 1 1/8" wide blade, a nice handy size.


The plane disassembled.


Removing the blade revealed an additional inset mark which is another nice touch. Although I studied Latin at school I wasn't very good and it was a long time ago! My son helped out,'made by Smith 2012'.


A shot of the tapered holly mouth closer.


The cast steel blade was immaculately prepared and it was no surprise that it performed superbly. I think you'll be seeing more of plane maker Tim Smith.

Monday 18 June 2012

Walnut Bookcase


This is a job for home that's well overdue. This is my rough sketch and cutting list, I managed to get the whole carcass from one 8x4 sheet. The finished bookcase will look much better than the sketch, I hope!


The sides and top are chunky to match the work surface in our kitchen and I achieved this by gluing together two pieces of walnut veneered MDF in the vacuum press. I put in both sides at once to save time.


I lipped the show edge with 8 mm walnut against the flat surface of my work bench. This style of bench with the frame flush with the top comes in very useful for all sorts of clamping.


Here I'm cutting some 1 mm lipping for the ends of the top. I'm using a Mag Switch feather board which works very well and is easy to set, this keeps things nice and even and keeps my hands well clear of the blade. You can see I also use Mag Switches on my home made fence.


It's nice to have more than one workbench in the workshop as well as plenty of clamps!


Cleaning up the edges is quickly done with a block plane, this is quicker and less noisy than with a router.


The jointing is done with a Domino, a great tool. To do the trial assembly I use slightly undersized tenons which are trimmed with a block plane. I mark these with an 's' for small and keep a selection in each size.


Here is the trail fit, I've rebated the back edge to receive the back panel. This reminds me why I don't use MDF very much, horrible dust everywhere despite the vacuum.


This is the base being glued up with a couple of spacer pieces to keep things square and add lateral support.


Oh by the way I couldn't resist making two more boxes from the Victory oak and that's it gone. Shown here lined with bottle green and royal blue pig suede along with their certificates.

Sunday 17 June 2012

Wood from Yandles yard


Every month or two I call into Yandles wood yard for a rummage around. They have a large shed and all the wood is end stacked so you can hand pick the boards. This can be a bit hairy with longer boards but long may it last!
The first wood to catch my eye was a short piece of 4" thick beech. I only really use beech for bench tops (unless it's spalted) but this was bang on quarter sawn which showed nice tight medullary flecks as well as having lines of nice dark heartwood. The wood was air dried and showing some end splits, so I decided to re saw it into 4 x 1" boards to prevent it splitting any further and to help it dry much faster.


It has the look of a landscape and should make a few very nice boxes.


The other wood I came away with were these three boards of 3/4" elm. They have a nice colour contrast with the darker heart as well as a nice straight grain which is ideal for box sides.


Right along the boards there is a type of figuring that is difficult to pin down, half way between birds eye and ripple. It should produce a very nice effect in a finished piece.
Yandles also stock a good selection of exoctics and turning blanks and all prices are very reasonable. Definitely worth a visit if you're in the area.

Friday 15 June 2012

Mini Smoothers


 Here is the batch of mini smoothers I started a few weeks ago. They had been put to one side but now I've finally finished them off. I've not used Brazilian Tulipwood for this plane before and I was particularly pleased with the way they turned out.


There were some strong purple and pink stripes running through the cream background, that's four very pretty backsides!


Brazilian Tulipwood is very heavy and hard which is a great wood for planes but it's also fissile (splintery) so requires extra care to avoid unwanted break out particularly around the mouth.


The Kingwood turned just as pretty as usual, it deserves its name.


The Bocote (Mexican rosewood) is not as hard or as heavy as the other two but it has wonderful colour and grain pattern. The price has stayed the same for all the planes at a very reasonable £89.

Saturday 9 June 2012

Lining boxes with Andrew Crawford


 Last week I spent two very enjoyable and informative days with the famous box maker Andrew Crawford. I wanted to learn his techniques for fitting and lining box interiors. Here I am using his mini vacuum attachment for cleaning up.


Andrew is shown here cutting a 2mm slice of foam through the band saw, yes you can do that!! The blade was a fresh 6 tpi one and the foam was pushed through against a high fence with a sand paper backed board of mdf.


Here he is cutting slots on the inter connecting pieces with a 4mm router bit on the spindle moulder, yes you can do that as well! Note the pieces are being cut laying down which gives curved end to the slot and puts less pressure on the cutter. The spindle table was shrouded by a tight fitting jig incorporating a built in stop.


Here is his set up for sanding 45 degree mitres as well as trimming to 90 degrees. The jig has a hook to register it square. The sander was a monster and with no brake takes 45 minutes to stop once full speed has built up.


This is one of his fantastic boxes, if you're interested there will be very little change from £5,000.


For those of you familiar with Andrews magazine articles you'll know his is a great advocate of sanding machine and jigs rather than relying on planes. When I turned round and caught him squaring up some stock on a shooting board with my jointer plane I just had to get a shot!


This is one of the trays we fitted and lined with bottle green pig sued.


Here is a very neatly fitted ring rung, something I have always struggled with, but not any more. Below is a series of steps to take multiple trays on one of my larger jewellery boxes. This was lined in black to pick up on the spalted maple panel.


This box was lined in royal blue and the Victory oak box below was done in a nice muted burgundy.


I had been looking forward to this visit for a little while and it certainly didn't disappoint. I can see why his short courses get booked up so quickly.