Friday, 11 December 2015

Fun Chair from the US


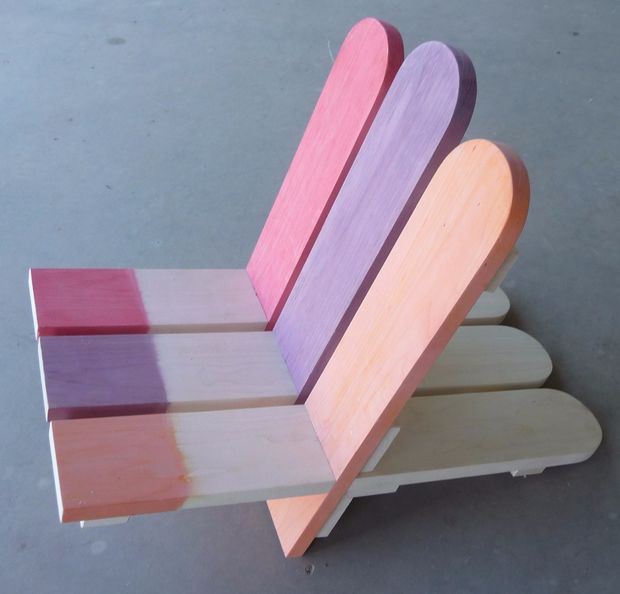
Dave a customer from the US sent me this picture of a popsicle chair he made for young children, very sweet!
If you are interested in seeing the full step by step project along with detailed plans you can see them here http://www.instructables.com/id/Childs-Popsicle-Stick-Deck-Chair/

Thursday, 3 December 2015

Lovely Walnut Tool Chest


Michael from MI in the USA sent me these pictures of his version of my Mark 2 tool chest and a fine job he has done! Above were his first set of hand cut dovetails, I wish mine had looked like that!


 Here are all the parts ready for assembly.


The lid separated from the base, always a nerve racking time!


The completed box comes alive with a nice oil finish.


A nicely fitted interior with both a piston fit tray as well as a soft close lid. Michael really took his time over the piston fit and has been impressing his family and friends!


 A very neat chisels tray and below the completed interior.


Michael describes himself as a novice woodworker who undertook a number of firsts on this project. He says he's learned a lot in making his chest and he should be very proud of the end result.


Tuesday, 1 December 2015

Wooden Swords


Kim, a good customer from the US, sent me some pictures of some fine wooden saws he has made. I'd never heard of such things but you live and learn. There's more detail on his website  http://tangswords.wix.com/tang-wooden-swords


Friday, 27 November 2015

Roubo Bench with BenchCrafted Glide Vice


At the Handworks show in Iowa this year Mark Hicks http://old.plate11.com/ kindly lent me a bench with a BenchCrafted glide vice with criss cross. I was so impressed I brought one back with me (the vice not the bench!) All I needed to do was to build a bench. This one is as simple as it gets with 4" square legs and frame and a 4" thick beech top. The top was laminated from stock from an old bench as well as new material. Above is half the top being glued up, the laminations were done one board at a time to ensure no glue lines.


Here are the parts for the criss cross with the main waste being excavated on the drill press.
Below you can see evidence of the salvaged parts complete with dogs holes and cut off dominoes. Most of these will be hidden underneath or inside the top.


With the two halves lined up I'm checking for flatness to eliminate too much flattening afterwards.


they lined up well but the there was a gap in the middle which was too big to clamp up. After a fair bit of hand planing and checking the gap was small enough to clamp up


I only need to clamp in the middle as the ends were pulled tight on their own.
Note the two clamps on the end to keep the parts level.


Back to the Criss Cross mortises which were finished off with a 1/2" router and up spiral bit.


The frame was built from 4" square beech and pine and the only thing needed to hold the top firmly in place was a couple of dominoes. They were dry fitted on one end and fitted to the end grain of the front legs to keep the top flush with the frame. The weight of the top does the rest.


Unfortunately I couldn't avoid some of the salvaged wood showing some dominoes on the topside. I was going to leave this but just couldn't bring myself to, so it was patches to the rescue!


I cut 3 mm (1/8") thick diamonds from some off cuts. I used the disc sander to put a 3 degree bevel on each of the edges which meant that after knifing the patch and removing the waste it could be hammered home to a really tight fit.


The patches worked well although some were a better colour match than others.


And here's the finished bench, simple robust and a joy to use. The Glide Vice with the Criss Cross was actually much easier and quicker to fit than the mark one version with the peg board that I installed a few years ago. All it needs are a few dog holes and it's ready to go to work.

Tuesday, 24 November 2015

Arts and Crafts Cabinet at Auction

 A short while ago this small stationary cabinet came up for auction and I was really taken by its proportions and small size. It's a beautiful little thing, measuring 43 cm wide x 24 deep x 31.5 high (17" x 9 1/2" x 12 1/2")
 It is made from French walnut which has faded over the years to a nice colour. The corners are through dovetailed in true arts and crafts style.


The lower rails also features wedged through tenons.


The drawer has nice done drawer slips and a curved front lip. The auction estimate was £100 - £150 so I thought I would have a go, but in the end there were obviously plenty more admirers and it went under the hammer for £650. After adding on the commission and carriage charges etc that totalled about £850, far too much for me. The good news is that given the dimensions, I was able to scale off the main photo and get all I needed to build a version for myself, watch this space!!


Friday, 20 November 2015

New Work Bench Finally Arrives!


My new work bench made by Leif Karlsson in Sweden has arrived http://www.workbenches.se/en/index.php.
The carriers in this country lost it for a week but thankfully found it again!
It the smallest of the benches he produces at 1600 mm long (53") but this is an ideal size for the way I work and is still a pretty hefty bench. He made it taller than normal at 37" which suits me.


It is a traditional Scandinavian bench with a hefty tail vice and very useful shoulder vice.
Considering the work involved they are very reasonably priced, even with the shipping costs from Sweden.

There are five sets of large scale dovetails..........


........both through and half blind.


The top is mortised and tenoned into the cross rail for added strength.
It's no wonder no one is making this style of bench any more.


The tusk tenons lock the frame firmly together, such a simple and effective joint.


Leif kindly signed the bench for me, this was to be the last he was going to make before retiring. But he's since told me he's turned 8 more vice screws, so if you are interested in one of his fine benches I'm sure he can be persuaded!


Tuesday, 17 November 2015

Lovely Miniature Toolbox


A friend of mine from Canada has just completed a third scale version of a Tommy Mac tool chest which he built a while back. He has a number of miniature tools which prompted the build.


You can see the webframe construction for the drawers above, and below the finished chest in action.
If you'd like to see the full article please see Richard's Blog
http://richard-wile.blogspot.co.uk/2015/11/honey-i-shrunk-tommy-mac.html